Java Resizable Array
Jakob Jenkov |
Sometimes you want to keep data (typically raw bytes) in a single, consecutive array for fast and easy access, but need the array to be resizable, or at least expandable. Java arrays are not resizable, so using an array by itself is not sufficient. Thus, to get a resizable array for primitive types you need to implement it yourself. In this tutorial I will show you how to implement a resizable array in Java.
Why not Use an ArrayList?
You might wonder why you cannot just use a Java ArrayList for this purpose. The answer is - you can if one of these conditions are true:
- You are storing some object type in the array.
- You are storing primitive types in the array and performance and memory usage doesn't matter.
The Java ArrayList class only works for objects - not for primitive types (byte, int, long etc). If you use a Java ArrayList to store primitive data it will be autoboxed into an object when inserted into the ArrayList, and unboxed out of this object back to a primitive type. This boxing and unboxing adds an overhead to insertion of and access to each element - which you do not want when you are trying to optimize for performance (this article is part of my Java Performance trail).
Additionally, you have no guarantee for where in memory the autoboxed objects are stored. They can be scattered all over the heap. Thus consecutive access to them can be much, much slower than when stored consecutively in memory - in a primitive type array.
Additionally, storing a primitive in its object counterpart (e.g. a long in a Long object) incurs significant extra memory overhead per element.
Java Resizable Array - GitHub Repository
The code for the Java resizable array implemented in this tutorial can be found on GitHub (for easy access):
https://github.com/jjenkov/java-resizable-array
The code consist of 3 Java classes and 2 unit tests.
Resizable Array Use Case
Imagine you have a server receiving messages of varying sizes. Some messages are very small (e.g. less than 4KB), others as large as 1MB or even larger. If the server cannot see from the beginning of the message how big the message will end up being, there is no way of pre-allocating the correct amount of memory for that message. The alternative is to "over-allocate", meaning allocate a memory block that we believe is big enough to hold the message.
If the server is receiving messages from many (100K +) connections at the same time, we need to limit how much memory we allocate for each message. We cannot just allocate the maximal message size (e.g. 1MB or 16MB etc.) for each message buffer. That would deplete the server memory fast when the number of connections and messages go up! 100.000 x 1MB = 100GB (approximately - not precisely - but you get the picture).
The alternative is to start with a smaller buffer and if that buffer turns out not to be big enough to hold the full message, we expand the buffer.
Array Expansion is Expensive
To expand an array you must:
- Allocate a new, bigger array.
- Copy all data from the old array to the new array.
- Deallocate the old array.
This is an expensive set of operations! Especially the copying of the old data to the new data gets more and more expensive the larger the old array is.
Note, that in languages with built-in garbage collection (like Java, C# etc.) you do not explicitly have to deallocate the old array, but the VM still has to do it, so your application still pays the deallocation price sooner or later.
Minimizing Array Expansion
To minimize the price paid for array expansion you want to expand the array as few times as possible, in order to make it large enough to hold the total message.
If we assume that most messages are small, we can start with a small buffer. If a message grows beyond the small buffer size, we allocate a new, medium sized array and copy the data to the new, medium sized array. If the message outgrows the medium sized array too, a large array is allocated, and the message is copied to that. The large array should be the largest size allowed for a message. If the message outgrows the large message buffer, it is too large to be processed and should be rejected by the server.
Using this strategy, most messages will only ever use a small buffer. This means that the server memory is used more efficiently. 100.000 x 4KB (small buffer size) is only 400MB. Most servers should be able to handle that. Even at 4GB (1.000.000 x 4KB) modern servers should be able to handle it.
Resizable Array Design
The resizable array is designed to consist of two components:
- ResizableArray
- ResizableArrayBuffer
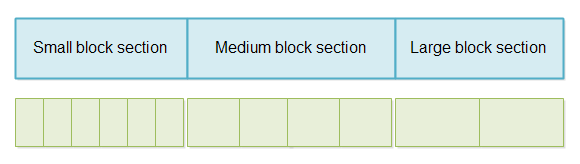
The ResizableArrayBuffer contains a single, large array. This array is divided into three sections.
One section for small arrays, one for medium size arrays and one for large arrays.
The ResizableArray represents a single, resizable array, with its data stored in the array in
the ResizableArrayBuffer.
Here is a diagram illustrating the large array divided into sections, and each section divided into blocks.
By reserving an area of the large array in the ResizableArrayBuffer for each message size interval
(small, medium, large), we make sure that the array cannot be fully filled with either size messages. For instance,
receiving a lot of small messages cannot take all the memory and thus block for medium and large messages. Similarly,
receiving a lot of large messages cannot take up all memory and block for medium and small messages.
Since all messages start as small messages, if the amount of small arrays is depleted, no new arrays can be allocated, regardless of whether or not there is space in the medium and large array sections. However, it is possible to make the small array section large enough that the probability of this happening is very low.
It is still possible to grow small messages into medium and large messages, even if the small message section is fully used.
Optimization Options
A possible optimization is to use only a single block size. Thus, sometimes a newly allocated block might be allocted just after the block that needs to be expanded. In that case you don't need to copy the data from the old array to the new. You can simply "expand" the block to include both of the two allocated blocks, and write new data into the expanded block from where the second block was added. This saves copying of all array data when a memory block can be "expanded" into the next consecutive block.
A drawback of the above mentioned possible optimization is, that in the cases where it is not possible to expand into the next memory block, copying of data is still necessary. Thus you have a small overhead of checking if expansion is possible. Additionally, if you use a small block size, you may have to expand blocks more often than if you use e.g. a small, medium and large block size.
Keeping Track of Free Blocks
The large array inside the ResizableArrayBuffer is split up into three sections. Each section is split
up into smaller blocks. Each block in each section has the same size. Blocks in the small message section has the
same small block size. Blocks in the medium message section has the same medium block size. And blocks in the
large message section has the same large block size.
When all blocks within a section has the same size, it is easier to keep track of used and unused blocks. You can simply use a queue containing the start indexes of each block. One queue is needed for each section of the shared array. Thus, one queue is needed to keep track of free small blocks, one queue for free medium blocks and one queue for free large blocks.
Allocating a block from any of the sections can be accomplished simply by taking the next free block start index from the queue associated with the desired section. Freeing a block is done by putting the start index back into the corresponding queue.
As a queue I have used a simple Ring Buffer implementation. The implementation
used in the GitHubRepository is called QueueIntFlip.
Expand on Write
The Resizable array will expand itself when you write data to it. If you attempt to write more data to it than it has space for in its currently allocated block, it will allocate a new, larger block and copy all its data to that new block. The previous smaller block is then freed.
Freeing Arrays
Once you are done with a resizable array you should free it again, so that it can be used for other messages.
Using the ResizableArrayBuffer
I want to show you how to use the ResizableArrayBuffer (from the GitHub repository).
Creating a ResizableArrayBuffer
First you must create a ResizableArrayBuffer. You do so like this:
int smallBlockSize  =    4 * 1024;
int mediumBlockSize =  128 * 1024;
int largeBlockSize  = 1024 * 1024;

int smallBlockCount  = 1024;
int mediumBlockCount =   32;
int largeBlockCount  =    4;

ResizableArrayBuffer arrayBuffer =
        new ResizableArrayBuffer(
                smallBlockSize , smallBlockCount,
                mediumBlockSize, mediumBlockCount,
                largeBlockSize,  largeBlockCount);
This example creates a ResizableArrayBuffer with a small array size of 4KB, medium array size of
128KB and a larger array size of 1MB. The ResizableArrayBuffer contains space for 1024 small arrays (4MB in total),
32 medium arrays (4MB in total) and 4 large arrays (4MB in total) - for a full shared array size of 12MB.
Obtaining a ResizableArray Instance
To obtain a ResizableArray instance, call the ResizableArrayBuffer's getArray()
method, like this:
ResizableArray resizableArray = arrayBuffer.getArray();
This example obtains a ResizableArray of the smallest size (4KB the small size was set to earlier).
Writing to a ResizableArray
You write to a ResizableArray by calling its write() method. The ResizableArray
class in the GitHub repository only contains a single write() method which takes a ByteBuffer
as parameter. It should be pretty easy to add more write() methods yourself, though.
Here is a write example:
ByteBuffer byteBuffer = ByteBuffer.allocate(1024);

for(int i=0; i < 1024; i++){
    byteBuffer.put((byte) i);
}
byteBuffer.flip():

int bytesCopied = resizableArray.write(byteBuffer);
This example copies the contents of the ByteBuffer into the array (block) of the ResizableArray.
The value returned by write() is the number of bytes copied from the ByteBuffer.
In case the ByteBuffer had contained more data than the ResizableArray, the
ResizableArray will attempt to expand itself to make space for the data in the ByteBuffer.
If the ResizableArray cannot contain all the data in the ByteBuffer after expanding
itself to the max size, the write() method will return -1 and no data will have been
copied at all!
Reading From a ResizableArray
When you read from a ResizableArray you do so directly in the shared array which all
ResizableArray instances share. The ResizableArray contains the following
public field:
public byte[] sharedArray = null;
public int    offset      = 0;
public int    capacity    = 0;
public int    length      = 0;
The sharedArray field references the shared array which all ResizableArray instances
keep their data in. That is the array kept internally in the ResizableArrayBuffer too.
The offset field contains the start index in the shared array where this ResizableArray
keeps its data (the block assigned to it).
The capacity field contains the size of the block in the shared array assigned to this
ResizableArray instance.
The length field contains how much of the assigned block the ResizableArray is actually
using.
To read the data written to a ResizableArray simply read the bytes from sharedArray[offset]
to sharedArray[offset + length -1].
Freeing a ResizableArray
Once you are done using a ResizableArray instance you should free it. You do so simply by calling
the free() method on the ResizableArray, like this:
resizableArray.free();
Calling free() takes care of returning the used block to the correct block queue, regardless of
the size of the block allocated to the ResizableArray.
Variations on the Design
You can change the design of my ResizableArrayBuffer to meet your needs. For instance, you can
create more than 3 sections inside it. It should be fairly easy to do. Just look at the code in the GitHub
repository and modify it.
| Tweet | |
Jakob Jenkov | |